Getting Started with AutoGluon: Your First Steps in Automated Machine Learning

Getting Started with AutoGluon: Your First Steps in Automated Machine Learning
This guide introduces AutoGluon, an open-source AutoML library from Amazon Web Services (AWS), designed to simplify the machine learning process. It enables users to build high-quality models with minimal code, automating tasks like model selection, hyperparameter tuning, feature preprocessing, and ensembling. This tutorial focuses on tabular data and walks you through installation, training, evaluation, and prediction using the Titanic dataset.
Why AutoML?
Machine learning can be complex and time-consuming, involving numerous steps like data cleaning, feature engineering, model selection, and parameter tuning. AutoML solutions like AutoGluon automate these tedious tasks, allowing practitioners to focus on problem-solving rather than getting bogged down in technical details. AutoGluon makes it possible to develop high-performing models with just a few lines of code, making ML accessible even without a deep technical background.
What is AutoGluon?
AutoGluon is a powerful AutoML library that automates the end-to-end ML workflow. It supports various data types, including tabular, text, and image data. Key features include:
- Automated Model Selection: Tests various algorithms to find the best-performing ones for your task.
- Hyperparameter Optimization: Automatically tunes model parameters to maximize performance.
- Intelligent Feature Preprocessing: Handles missing values, categorical features, and data scaling.
- Advanced Ensembling: Combines multiple models to achieve superior accuracy.
For this tutorial, we will focus on using AutoGluon for tabular data.
Step 1: Installation
AutoGluon is compatible with Python versions 3.9 to 3.12 and runs on Linux, macOS, and Windows.
- Verify Python Version:
python --version - Install AutoGluon:
Note: Installation might take a few minutes due to dependencies. Refer to the official documentation if you encounter issues.pip install autogluon
Step 2: Train Your First AutoGluon Model
We'll use the classic Titanic dataset to predict passenger survival.
2.1 Import Libraries and Load Data
First, import necessary libraries and load the dataset from a URL.
from autogluon.tabular import TabularDataset, TabularPredictor
from sklearn.model_selection import train_test_split
import pandas as pd

url = 'https://raw.githubusercontent.com/datasciencedojo/datasets/master/titanic.csv'
data = TabularDataset(url)

# Split data into training (80%) and testing (20%) sets
train_data, test_data = train_test_split(data, test_size=0.2, random_state=42)
print(f"Training samples: {len(train_data)}")
print(f"Testing samples: {len(test_data)}")
Output:
Training samples: 712
Testing samples: 179
2.2 Train the Model
Define the target variable (Survived) and train the model using TabularPredictor.
# Define the target variable
target = 'Survived'

# Train the model
predictor = TabularPredictor(label=target).fit(
    train_data=train_data,
    time_limit=120,  # Set a time limit (e.g., 2 minutes)
    presets='best_quality'  # Use 'best_quality' for optimal results
)
Key Parameters:
TabularPredictor(label=target): Initializes the predictor for the specified target variable..fit(...): Trains multiple models.time_limit: Controls the maximum training duration. A longer limit generally leads to better accuracy.presets: Allows balancing training speed and accuracy. Options include'medium_quality','high_quality', and'best_quality'.
Step 3: Evaluate Model Performance
Assess the trained model's performance on the unseen test data.
# Make predictions on the test set
y_pred = predictor.predict(test_data.drop(columns=[target]))

# Evaluate the model's accuracy
performance = predictor.evaluate(test_data)
print(f"Model Accuracy: {performance['accuracy']:.2f}")
Output:
Model Accuracy: 0.80
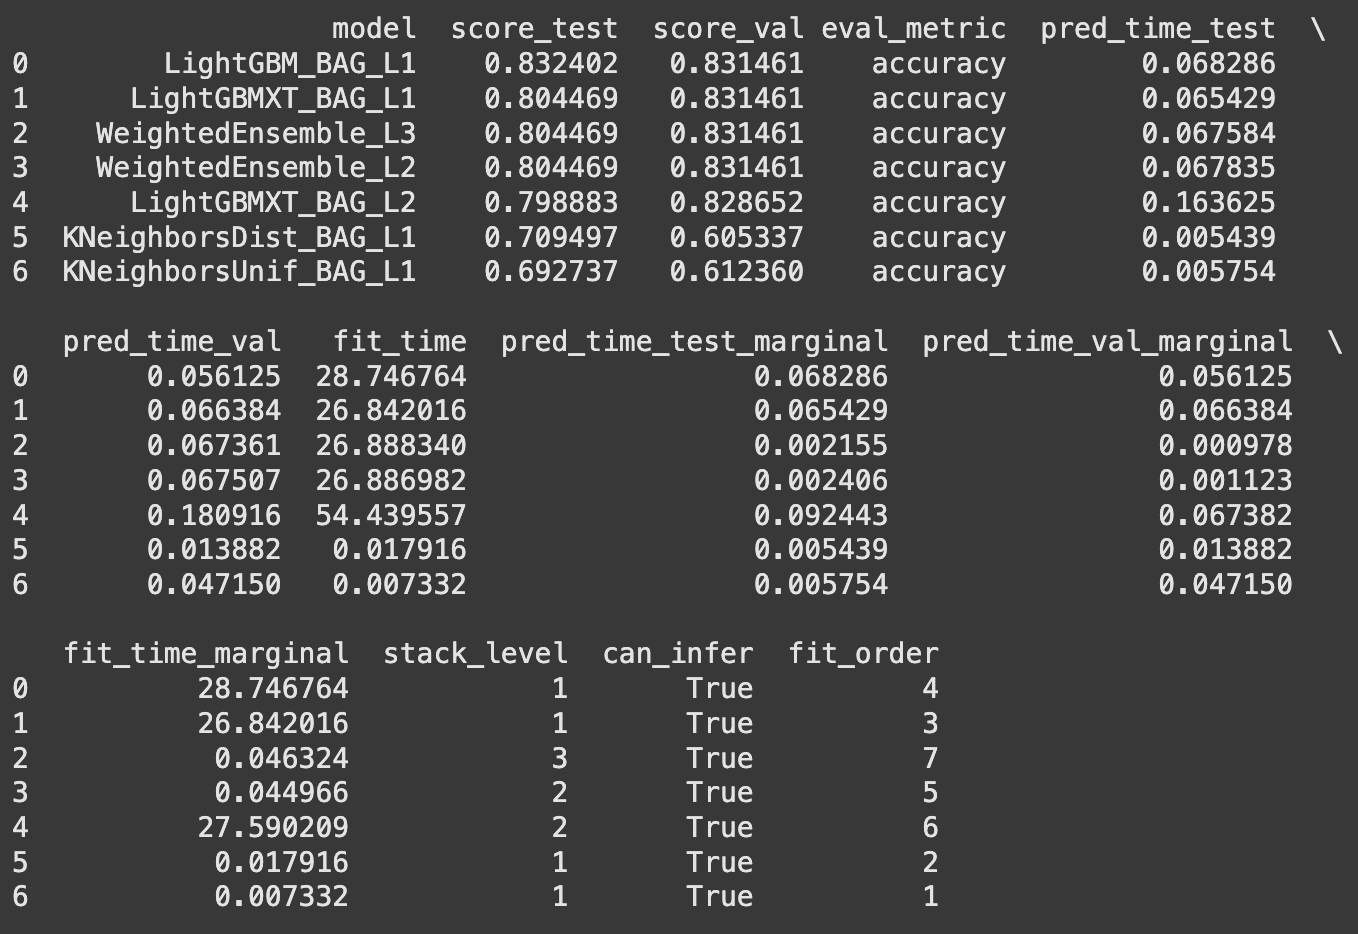
AutoGluon provides a leaderboard that lists all tested models, ranked by their performance. The top-performing model is typically an ensemble of the best individual models.
# Display the leaderboard
leaderboard = predictor.leaderboard(test_data)
print(leaderboard)
Step 4: Make Predictions on New Data
Use the trained predictor to make predictions on new, unseen data points.
# Create a DataFrame for a new passenger
new_passenger = pd.DataFrame({
    'PassengerId': [99999],
    'Pclass': [3],
    'Name': ['John Doe'],
    'Sex': ['male'],
    'Age': [25],
    'Ticket': ['UNKNOWN'],
    'Fare': [7.25],
    'Cabin': ['UNKNOWN'],
    'Embarked': ['S'],
    'SibSp': [0],
    'Parch': [0]
})

# Predict survival for the new passenger
prediction = predictor.predict(new_passenger)
print(f"Survival prediction: {'Yes' if prediction[0] == 1 else 'No'}")
Output:
Survival prediction: No
Tips for Success
- Data Quality: While AutoGluon handles many data issues, clean and prepare your data thoroughly for optimal results. Remove irrelevant columns (like
PassengerId) and address missing values proactively. time_limitTuning: Start with shortertime_limitvalues (e.g., 120 seconds) for quick testing and increase it (e.g., 600 seconds or more) for better accuracy, depending on your computational resources.- Feature Engineering: AutoGluon excels at automating many ML tasks, but domain knowledge and manual feature engineering (e.g., creating 'FamilySize' from 'SibSp' and 'Parch') can significantly boost model performance.
- Understand Limitations: Be aware of the computational cost associated with longer training times and the potential for "black-box" models where interpretability might be reduced in favor of performance.
Wrapping Up
AutoGluon empowers you to build and deploy machine learning models efficiently. With just a few lines of Python code, you can achieve impressive results on tabular data. Explore different datasets, experiment with AutoGluon's capabilities for text and image data, and fine-tune hyperparameters for even greater control.
Original article available at: https://www.kdnuggets.com/getting-started-with-autogluon-your-first-steps-in-automated-machine-learning